
Trong bài viết trước, chúng ta đã tìm hiểu cách để cài đặt và sử dụng Tailwind với NextJS và Nx workspace. Tiếp tục series, bài viết này sẽ chỉ cho chúng ta cách đọc files từ hệ thống, parse Markdown và render sang HTML. Đấy cũng là cách mà Nx giúp chúng ta tạo và tổ chức các tính năng trong thư viện của nó. Rendering file Markdown cũng là 1 phần thiết yếu khi tạo 1 ứng dụng JAMStack.
Link bài trước:
Link bài gốc: https://blog.nrwl.io/read-and-render-md-files-with-next-js-and-nx-89a85c1d9b44
Cài đặt thư viện cần thiết
Trước tiên chúng ta sẽ cần cài đặt 1 số thư viện cho việc phát triển các tính năng mới:
yarn add gray-matter add remark remark-htmlChúng ta sẽ lưu tất cả các file markdown vào 1 folder ở root đặt tên là _articles. Trong bài demo mình sử dụng file _articles/dynamic-routing.md với nội dung như dưới đây:
---
title: 'Dynamic Routing and Static Generation'
excerpt: 'Lorem ipsum dolor sit amet, consectetur adipiscing elit, sed do eiusmod tempor incididunt ut labore et dolore magna aliqua. Praesent elementum facilisis leo vel fringilla est ullamcorper eget. At imperdiet dui accumsan sit amet nulla facilities morbi tempus.'
date: '2020-03-16T05:35:07.322Z'
author:
  name: JJ Kasper
---Lorem ipsum dolor sit amet, consectetur adipiscing elit, sed do eiusmod tempor incididunt ut labore et dolore magna aliqua. Praesent elementum facilisis leo vel fringilla est ullamcorper eget. At imperdiet dui accumsan sit amet nulla facilities morbi tempus. Praesent elementum facilisis leo vel fringilla. Congue mauris rhoncus aenean vel. Egestas sed tempus urna et pharetra pharetra massa massa ultricies.## Lorem IpsumTristique senectus et netus et malesuada fames ac turpis. Ridiculous mus mauris vitae ultricies leo integer malesuada nunc vel. In mollis nunc sed id semper. Egestas tellus rutrum tellus pellentesque. Phasellus vestibulum lorem sed risus ultricies tristique nulla. Quis blandit turpis cursus in hac habitasse platea dictumst quisque. Eros donec ac odio tempor orci dapibus ultrices. Aliquam sem et tortor consequat id porta nibh. Adipiscing elit duis tristique sollicitudin nibh sit amet commodo nulla. Diam vulputate ut pharetra sit amet. Ut tellus elementum sagittis vitae et leo. Arcu non odio euismod lacinia at quis risus sed vulputate.
Handle dữ liệu trong NextJS
Nhắc lại chút kiến thức của NextJS, có 3 functions cơ bản để xử lý fetching data:
getStaticProps– (Static Generation) to fetch data lúc buildgetStaticPaths– (Static Generation) chỉ định các router động được prerender tại lúc buildgetServerSideProps– (Server-side Rendering) to fetch data mỗi khi có request từ client
Phần này các bạn có thể đọc chi tiết hơn ở doc của NextJS nhé: https://nextjs.org/docs/basic-features/data-fetching/overview
Trong bài toán của chúng ta, với mục đích là tạo ra blog nên ta sẽ sử dụng 2 function đầu tiên.
Chúng ta sẽ có những bài viết Markdown trong thư mục _articles, chẳng hạn như có 2 file: dynamic-routing.mdx and nextjs-update.mdx. Để truy cập đến 2 file đó, URL của chúng ta sẽ dạng như sau: /articles/<filename>. Như vậy ta sử dụng function getStaticPaths cho bài toán này với dạng slug như sau:
[
  { "params": { "slug": "dynamic-routing" } },
  { "params": { "slug": "nextjs-update" } }
]
Tạo page Articles
Tạo page mới để hiển thị bài viết (articles): apps/site/pages/articles/[slug].tsx. [slug] với lệnh sau:
npx nx generate @nrwl/next:page --name=[slug] --project=site --directory=articlesXử lý để lấy path file từ URL như sau:
// apps/site/pages/articles/[slug].tsx
import fs from 'fs';
import { join } from 'path';
...
interface ArticleProps extends ParsedUrlQuery {
  slug: string;
}

const POSTS_PATH = join(process.cwd(), '_articles');

...

export const getStaticPaths: GetStaticPaths<ArticleProps> = async () => {
  const paths = fs
    .readdirSync(POSTS_PATH)
    // Remove file extensions for page paths
    .map((path) => path.replace(/\.mdx?$/, ''))
    // Map the path into the static paths object required by Next.js
    .map((slug) => ({ params: { slug } }));

  return {
    paths,
    fallback: false,
  };
};
Ok, đến đây là các bước cần rồi nhé, mình sẽ không xử lý logic liên quan đến Markdown vào trong phần getStaticPaths này. Chúng ta đi vào phần chính của bài là tạo libs cho Nx workspace. Ở đây chúng ta sẽ tạo libs cho việc xử lý thao tác với Markdown.
- Đọc nội dung file markdown từ hệ thống file
- Parse Markdown theo đúng format
- Chuyển nó sang dạng HTML
- Chuyển HTML và dữ liệu sang React component
Tạo libs trong Nx workspace
Nx luôn khuyến khích việc chuyển các logic business vào trong libs của workspace, nó sẽ giúp bạn tái sử dụng và có thể dễ dàng định nghĩa các APIs ngay từ đầu so với việc nhét chung vào 1 folder.
npx nx generate @nrwl/workspace:lib --name=markdown
Chúng ta sẽ tạo 1 lib với tên markdown cho bài toán trên.
- Đọc và parse Markdown
Tại thư mục markdown libs, chúng ta tạo file markdown.ts, trong đó tạo function getParsedFileContentBySlug để đọc file. Tiếp đó sử dụng gray-matter để parse nội dung:
// libs/markdown/src/lib/markdown.ts

import fs from 'fs';
import { join } from 'path';
import matter from 'gray-matter';

export const getParsedFileContentBySlug = (
  slug: string,
  postsPath: string
) => {

  const postFilePath = join(postsPath, `${slug}.mdx`);
  const fileContents = fs.readFileSync(postFilePath);

  const { data, content } = matter(fileContents);

  return {
    frontMatter: data,
    content,
  };
};
Định nghĩa 2 interface cho tiêu đề và nội dung của bài viết trong file types.ts
// libs/markdown/src/lib/types.ts
export interface FrontMatter {
  [prop: string]: string;
}

export interface MarkdownDocument {
  frontMatter: FrontMatter;
  content: string;
}
// libs/markdown/src/lib/markdown.ts
...
import { MarkdownDocument } from './types';
export const getParsedFileContentBySlug = (
slug: string,
postsPath: string
): MarkdownDocument => {
...
return {
frontMatter: data,
content,
};
};Nhớ export chúng ra:
// libs/markdown/src/index.ts
export * from './lib/types';
export * from './lib/markdown';
Giờ chúng ta có thể call function getParsedFileContentBySlug từ getStaticProps trong app của chúng ta articles/[slug].tsx.
// apps/site/pages/articles/[slug].tsx
import {
  getParsedFileContentBySlug
} from '@juridev/markdown'

...


export const getStaticProps: GetStaticProps<ArticleProps> = async ({
  params,
}: {
  params: ArticleProps;
}) => {
  // read markdown file into content and frontmatter
  const articleMarkdownContent = getParsedFileContentBySlug(
    params.slug,
    POSTS_PATH
  );

  return {
    props: {
      slug: params.slug,
    },
  };
};

export const getStaticPaths: GetStaticPaths<ArticleProps> = async () => {...}
Lưu ý ở đây:
- Thằng index.ts của mỗi thư viện Nx sẽ giống như 1 public API cho các projects khác. Chỉ những gì được export ra thì mới có thể share và sử dụng bởi chỗ khác.
- Nx sẽ tự động thêm vào tsconfig.base.json khi chúng ta tạo thư viện nhờ mapping path của TypeScript. Vì thế việc của chúng ta đơn giản là import từ ‘@juridev/markdown’ giống như 1 NPM package.
Các bước tiếp theo sẽ được thực hiện 1 cách tương tự:
- Convert Markdown sang dạng HTML
Tạo thêm file markdownToHtml.ts trong thư mục libs/markdown và sử dụng remark để làm việc này:
//libs/markdown/src/lib/markdownToHtml.ts
import remark from 'remark';
import html from 'remark-html';

export async function markdownToHtml(markdown) {
  const result = await remark().use(html).process(markdown);
  return result.toString();
}
tiếp đó gọi trực tiếp function vừa tạo ở trên trong phần xử lý markdown
// libs/markdown/src/lib/markdown.ts
...

export const renderMarkdown = async (
  markdownContent: string
): Promise<string> => {
  return await markdownToHtml(markdownContent || '');
};
Cuối cùng thì đóng gói nó lại và sử dụng ở trong apps:
// apps/site/pages/articles/[slug].tsx
import {
  getParsedFileContentBySlug,
  MarkdownRenderingResult,
  renderMarkdown,
} from '@juridev/markdown'
import fs from 'fs';
import { join } from 'path';
import { GetStaticPaths, GetStaticProps } from 'next';

...
export const getStaticProps: GetStaticProps<MarkdownRenderingResult> = async ({
  params,
}: {
  params: ArticleProps;
}) => {
  // read markdown file into content and frontmatter
  const articleMarkdownContent = getParsedFileContentBySlug(
    params.slug,
    POSTS_PATH
  );

  // generate HTML
  const renderedHTML = await renderMarkdown(articleMarkdownContent.content);

  return {
    props: {
      frontMatter: articleMarkdownContent.frontMatter,
      content: renderedHTML
    },
  };
};

export const getStaticPaths: GetStaticPaths<ArticleProps> = async () => {...}- Render bài viết
Đến đây thì việc còn lại là hiển thị nó ra thôi:
// pages/articles/[slug].tsx
...
export function Article({ frontMatter, html }) {
return (
<div className="md:container md:mx-auto">
<article>
<h1 className="text-3xl font-bold hover:text-gray-700 pb-4">
{frontMatter.title}
</h1>
<div>by {frontMatter.author.name}</div>
<hr />
<main dangerouslySetInnerHTML={{ __html: html }} />
</article>
</div>
);
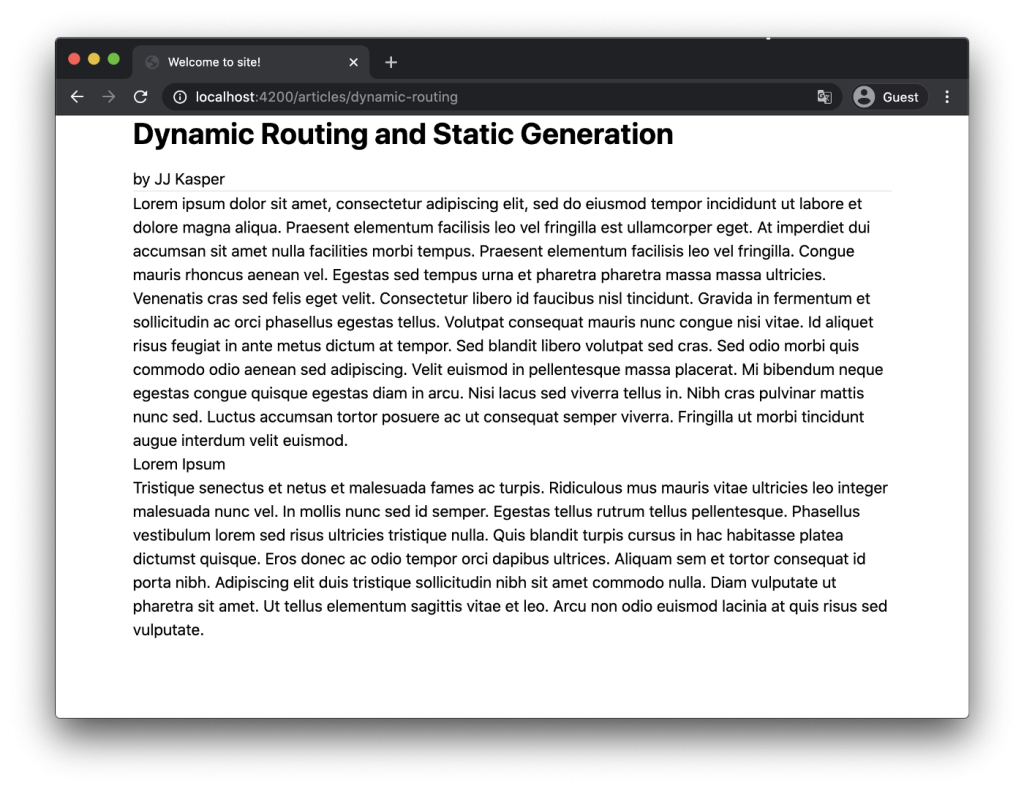
}Và khi bạn truy cập đến trang với URL /articles/dynamic-routing, kết quả hiển thị lên sẽ như dưới đây:
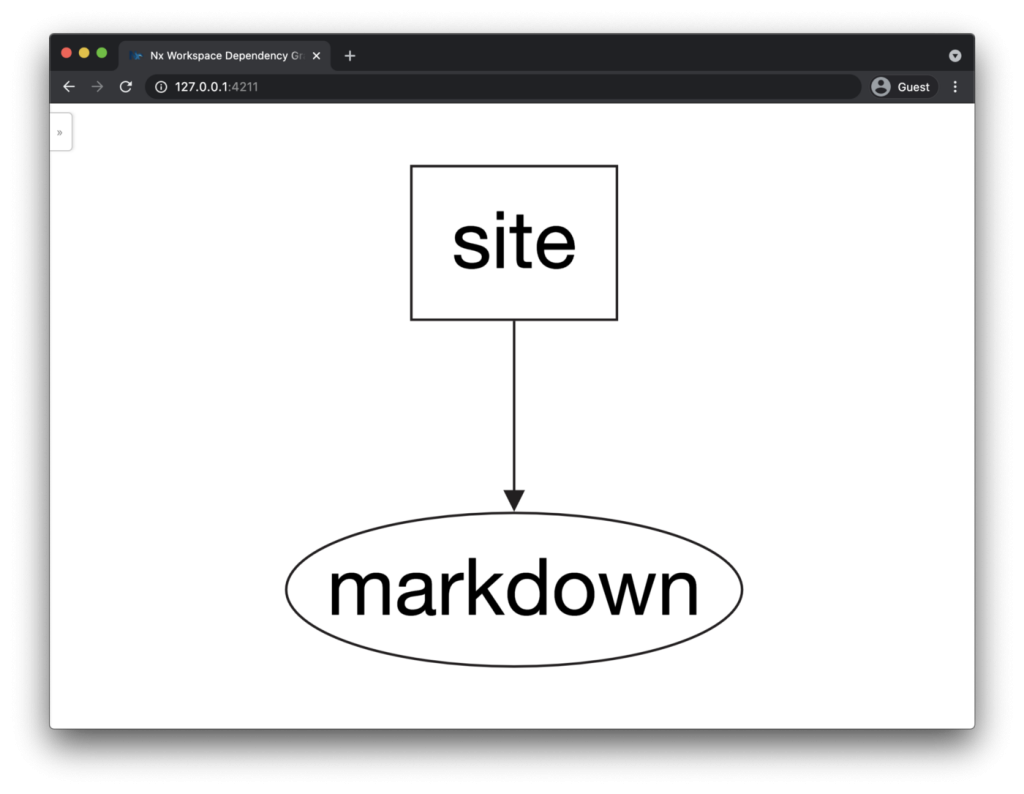
Ok, bài viết này khá dài. Nhưng vẫn còn 1 tool các bạn không thể bỏ qua, rất hữu ích cho bạn nào thích hình ảnh hóa. Đó là Dependency Graph.
npx nx dep-graphKết quả bạn nhận được là đây:
Cảm ơn mọi người đã đọc.